Tuesday, March 12, 2013

It's finally here! A Gluten Free / Dairy Free Reuben that tastes just like the real thing!


I made a allergen-free Reuben sandwich for my dear hubby. To say he was completely surprised (and let me tell you, it is next to impossible to surprise my hubby!!!) and thrilled would be a major understatement!!

 When I first met my husband, he told me that the one thing he'd intentionally break his diet for was a Reuben sandwich. He'd done this twice in the 14 years he'd been gluten and casein free. The last time he ate one was in 2005, and he absolutely loves that sandwich. So for the last 3 years, I've been scheming to make him a Reuben he wasn't going to have to suffer the consequences for later by being sick for 3 weeks minimum as a result.

The first breakthrough came when I discovered that Karina (the AMAZING Gluten Free Goddess) had posted a new recipe to her blog: a GF "Rye" Bread recipe that tastes exactly like its gluten-filled counterpart. I was completely thrilled! Finally! A way to make the distinctive bread so critical to a Reuben!

Unfortunately, there isn't a non-dairy Swiss cheese on the market, nor a Swiss cheese made with a non-bovine animal's milk such as goat or sheep. A couple of years went by as I mulled over how to solve this dilemma. I started hearing about vegan cheese recipes. A very intriguing idea. I found a vegan Swiss cheese recipe online, but before I made it, I happened to run across The Accidental Vegetarian's tips on vegan cheese creation. According to her, in order for a vegan cheese to taste like its dairy counterpart, the vegan cheese recipe has to match as close as possible in the following macros: Calories, Fat, Sodium, Carbohydrates, and Protein. Following her instructions, I checked out the macros for the vegan Swiss cheese recipe I'd found against real Swiss. Yikes! That wasn't going to taste anything remotely close to real Swiss cheese! Determined, I dug into her primer and started playing around with macros to create a vegan Swiss that would taste as close as possible to the real thing and melt well. I spent days crafting a vegan Swiss "cheese" recipe that would taste as close as possible to real Swiss cheese, and it turned out beautifully!!! Here are my final macros:

Real Swiss: 108 Calories / 7.88 g Fat / 54 mg Sodium / 1.53 g Carb / 7.54 g Protein
My Swiss: 115.9 Calories / 8.0 g Fat / 58.8 mg Sodium / 4.8 g Carb / 5.7 g Protein

I found gluten-free corned beef (another hard thing to find these days, but it's available at Whole Foods). Thousand Island dressing was a snap to make, and buying my husband's favorite sauerkraut from a health food store was a breeze.

I impatiently waited for my hubby to run a very long errand on the day of the Big Surprise so I could make the bread without his knowing. Funny story though: the bread was almost finished baking when he got home. He dutifully didn't look in the oven so that he wouldn't figure out what I was making, but I had to have him listen to see if the bread sounded hollow when I thumped it. That really threw him off. He was at a complete loss for what I could be possibly making, because he said it smelled like chocolate cookies but sounded like a hollow loaf of bread, but it didn't make any sense because he knew I wasn't making soup and that I wouldn't have been surprising him with chocolate chip cookies because I make those frequently already, so obviously I wasn't making bread bowls for a soup. LOL! He had absolutely no idea what in the world I was making for this surprise I'd been telling him about for weeks!

After the kiddo got picked up for a fun evening with the grandparents, I got out the thousand island dressing for my husband to see if he could figure it out what I'd made before I got the more obvious ingredients out.  He looked rather perplexed at the jar of unknown identity, opened it up, tasted it, and decided it was Thousand Island. A second or two later, the light bulb went off; he asked with a look of total disbelief and shock: "you made Reubens???". I wish I'd had a camera! He was absolutely thrilled at the idea of getting to eat a Reuben sandwich that was safe for him to eat! Utterly and completely thrilled! (I don't guess I'll never be able to top this one, but it was totally worth it to see his face!). 

After that, I pulled out the rest of the sandwich fixings out of the fridge and got out the instructions on how to assemble a Reuben. We had a grand time putting them together, and I discovered that I actually like Reubens after all, despite not liking any of the components by themselves. I don't personally like Swiss cheese, sauerkraut, thousand island dressing (it's tolerable, but not my favorite), rye bread, or corned beef. But somehow together they make a really amazing sandwich. Dear hubby (a.k.a. a Reuben Connoisseur) says it was a perfect Reuben! Score! :)

If you'd like to enjoy a Reuben too, here's the exact recipe plus assembling instructions that I used:

Karina's Gluten-Free Rye Bread  (To sub any ingredients, please click on the link for ideas.)
 All ingredients should be at room temperature.

Begin by lining a 1.5 lb. ceramic loaf pan with parchment paper.

In a mixing bowl, whisk your dry ingredients together:
1 cup sorghum flour
1 cup potato starch
1/2 cup brown rice flour
2 teaspoons xanthan gum
1 1/4 teaspoons sea salt
2 tablespoons unsweetened cocoa
2 teaspoons finely grated orange peel
2 teaspoons caraway seeds
heaping 1/4 teaspoon onion powder
1/2 teaspoon dill

In a glass measuring cup, proof your yeast:
Dissolve 1 teaspoon sugar in 1 1/4 cups warm water (110-115 degrees F).  Stir in 2 1/4 teaspoons rapid rise dry yeast. Allow the yeast to get poofy; pour the liquid into the dry ingredients.

Add:
4 tablespoons olive oil
1/2 teaspoon cider vinegar
5 teaspoons molasses
2 large eggs, beaten

Beat till smooth batter forms. Pour into the lined 1.5 lb. ceramic loaf pan and smooth evenly with wet fingers. Loosely cover pan and let rise 20 min in warm spot (I use my oven at 160 degrees F).  Preheat oven to 350 degrees. Bake 35-45 min (40 min in my oven) until it sounds hollow when thumped. If soft, place loaf directly on oven rack for 10 min for a crusty finish, if desired. Cool on wire rack before slicing.  Store in bread bag (keeping the saved bread heel against the sliced surface) in fridge; slice as needed. Makes ten slices.


Thousand Island Dressing (Make 1/2 recipe for Reubens.)
1 c. mayo
1/3 c. ketchup
1/2 t. onion powder
dash salt
3 T. sweet pickle relish

Put all ingredients in a glass pint jar. Seal jar; shake until smooth and creamy.


Dairy-Free Swiss Cheese (make 1/2 recipe for Reubens)
Ingredients:
1 1/2 c. water
5 1/3 t. unflavored gelatin (2 envelopes)
1 1/2 c. slivered almonds
1 T. coconut oil
1/3 c. rice milk
1 c.  Bragg’s nutritional yeast seasoning (Note: This recipe is specifically calibrated to use the macros of Bragg's; use other brands of nutritional yeast with vastly different macros at your own risk.)
Juice of half a lemon (approx. 1.5 T. juice)
2 T. cider vinegar
4 T. tahini
1 T. dijon mustard (I use 365 brand from Whole Foods)
1 T. onion powder
3/4 t. garlic powder
Heaping 1/8 t. salt

Directions: Sprinkle gelatin on 1/2 cup of cold water. Add 1 cup boiling water; stir till completely dissolved. Place the almonds and oil in a high-powered blender (such as VitaMix) and process for 1-2 minutes on high speed until a smooth paste forms. Scrape down the sides, add the remaining ingredients, and process for 1 more minute. Add gelatin mixture to the blender, and process for an additional 2 minutes. Lightly oil a 3-cup mold or small loaf pan or two 1.5-cup Pyrex glass storage containers. Pour the cheese mixture into the mold, cover, and chill overnight. Un-mold the cheese. Slice thinly with a sharp knife for Reubens or use in your favorite recipes instead of real Swiss cheese. Store in an airtight container in the refrigerator for 7-10 days. Freezes well.


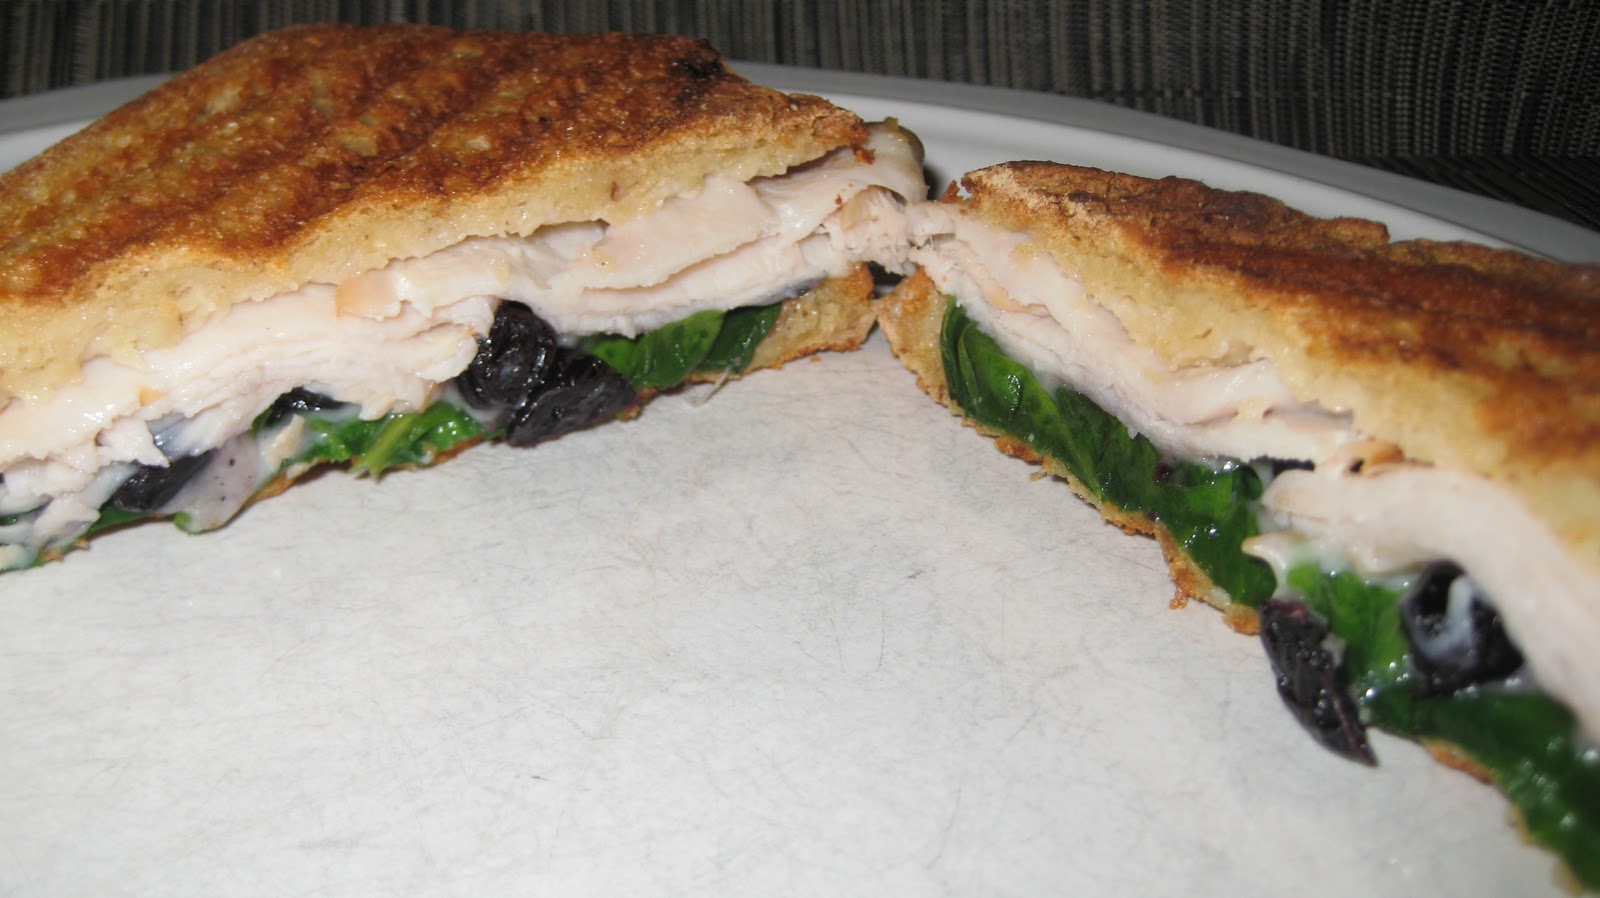
Assembling the Reuben Sandwich
Needed for one Reuben sandwich:
3.5 or 4 oz thinly-sliced, lean GF corned beef (Wellshire Farms is available online or at Whole Foods. If not in the deli, it’s available pre-packaged in 7 oz. packages nearby.)
2 thin slices of dairy-free Swiss cheese (recipe above)
2 Tablespoons of sauerkraut—I use Bubbie’s sauerkraut
2 Tablespoons of Thousand Island dressing (recipe above)
2 slices of GF rye bread (recipe above)

Directions:
Add two Tablespoons of vegetable oil or a mixture of margarine/ butter and oil to frying pan, skillet or flat-top grill. (I used a panini press). Heat until hot, over medium-high heat. Place two slices of rye bread in the hot pan or grill. Atop each slice of rye bread, place one slice of Swiss cheese. As the cheese melts and the bread begins to lightly brown, place approximately four ounces of corned beef in pan or grill and sauté until hot and lightly browned. When the cheese on the bread is fairly well melted, place corned beef on one slice of bread. Place approximately two Tablespoons of sauerkraut in a pan or grill and sauté briefly, until hot and barely browned. Place sauerkraut on top of the corned beef. Pour approximately 1 1/2 Tablespoons of Thousand Island dressing on top of the sauerkraut. Place the other slice of bread on top of the sandwich and press down, gently, to help keep the sandwich together, nice and neat. (I used the top of the panini press to press it down.)

Remove the Reuben sandwich from the grill or pan. When slicing a Reuben sandwich in half, do it with the tip of the knife pointing down, toward the cutting surface. Cut the sandwich carefully, almost with a 'sawing' motion. Reuben sandwiches have a propensity for falling apart and becoming a sticky mess, when cut without care.

ENJOY!! :
)

Tuesday, August 7, 2012

Sweet & Sour Chicken


Are you gluten-free and tired of missing out on sweet & sour chicken at Chinese restaurants? Check this out!


My family vastly prefers this sweet & sour chicken to the gluten-laden dish available on many Chinese menus. It doesn’t taste gluten-free at all! Try it for yourself!


Sweet and Sour Chicken

Ingredients:
1¾ c. water, divided
¾ c. sugar
½ c. apple cider vinegar
1 8-oz. can pineapple chunks, drained (juice reserved)
splash of tamari sauce
¼ c. sweet rice flour
~1.5 lb. skinless, boneless chicken breasts or thighs, cut into 1-inch cubes
1 c. + 2 T. GF all purpose flour + 1¾ t. baking powder + 1/8 t. salt
1 T. neutral oil
1 T. sweet rice flour
¼ t. salt
1/8 t. ground white pepper
1 egg
3/4 c. water
1 quart neutral oil for frying
1 green bell pepper, cut into 1-inch pieces

Directions:
In a saucepan, combine 1½ c. water, sugar, vinegar, reserved pineapple juice, and food coloring/tamari. Heat to boiling. Turn off heat. Combine ¼ c. sweet rice flour and ¼ c. water; slowly stir into saucepan. Continue stirring until mixture thickens.

Combine flour, 1 T. oil, 1 T. sweet rice flour, salt white pepper, and egg. Add 3/ 4 c. water gradually to make a thick batter. Stir to blend thoroughly. Add chicken pieces, and stir until chicken is well coated.

On medium heat, heat oil in skillet or wok. Fry chicken pieces in hot oil approximately 10 minutes, or until golden. Remove chicken and drain on paper towels.

When ready to serve, layer green peppers, pineapple chunks, and cooked chicken pieces over jasmine rice on a plate.                  

NOTE: Can fry chicken in advance. Re-heat by spreading on a cookie sheet and baking for approximately 15 minutes at 350 degrees.

Serves 4.

Friday, May 4, 2012

GF/CF Fried Pickles and Dairy-free,
“Better-Than-Hidden-Valley®” Ranch Dressing


Gluten-free/casein-free fried pickles and dairy-free, “better-than-Hidden-Valley®” ranch dressing? Yes, please!

Tonight, after a year and a half of my hubby asking me to make fried pickles again, I finally made them. This time, since I’d discovered an awesome dairy-free ranch dressing a while back, he finally got to dip his fried pickles into a bona fide ranch dressing. It was amazing. Absolutely amazing. Definitely a recipe worthy of my re-entering the wonderful world of blogging. Grab the ingredients out of your fridge, and get cooking!

The most awesome Ranch Dressing (tweaked from here) and dairy-free? Yes, believe it. Try it and see for yourself:

1 c. mayonnaise
½ t. dried Parsley
½ t. dried Chives
½ t. dried Dill
¼ t. Garlic powder
¼ t. Onion powder
⅛ t. Black Pepper
1¾ t. cider vinegar
3 T. & 2¼ t. rice milk*

* This measurement is as easy as 1-2-3:
  1. Put the 1¾ t. cider vinegar in a liquid measuring cup.
  2. Add rice milk, filling to the ¼ c. line.
  3. Then add just 1 more teaspoon rice milk.
Put all ingredients in small jar and seal with lid. Shake to combine ingredients thoroughly. Enjoy! 


The best Fried Pickles, using Bubbie's Kosher Dills? Read on (tweaked from here):
 
1 egg
1½ T. cider vinegar
½ c. rice milk
1½ t. gluten-free tamari soy sauce
⅛ t. Chipotle Fontera hot sauce
⅛ t. onion powder
½ t. McCormick’s seasoned pepper blend
1 c. + 2 T. gluten free all-purpose flour mix
½ t. salt
¼ t. + ⅛ t. ground black pepper
16 oz. jar Bubbie’s Kosher Dills, sliced

Combine all ingredients except pickles in medium bowl; mix well. Add in pickle slices, and stir till well coated.

Pre-heat 2 c. neutral oil (ideally safflower, though canola, grape seed, or refined sunflower oils work, too) over medium heat in a wok or deep fryer to 365 degrees F.

Use a fork to retrieve pickle slices from the batter and place them in the oil. Deep fry till golden brown. Drain on paper towels. (You can salt and pepper to taste, if you like; we didn't.)

Now… got your ranch mixed and your pickles fried? What are you waiting for? Dig in!

Thursday, March 10, 2011

A winner of a panini!

Yesterday saw the birth of an amazing panini combination. It started out innocently enough with some bread and smoked turkey, but suddenly my dear hubby had a flash of brilliance (this is actually a regular occurrence in the kitchen). Some friends of ours had gifted us with some dehydrated fruit recently, and this is the tale of how some of it ended up in a panini...


Turkey Blueberry Panini
Serves 2

Ingredients
4 slices GF bread, lightly toasted (toasting is unnecessary for non-GF bread)
2-4 handfuls baby spinach
4 slices smoked turkey deli meat
mayo
1-2 t. butter, melted
cinnamon
4-6 T. dehydrated blueberries
1/2 c. grated goat mozzarella cheese (can use cow mozzarella if not allergic)


Directions
Preheat panini press (I use a cast iron one) on medium heat while assembling the sandwiches. Divide the ingredients in half. On one piece of bread, spread a thin layer of mayo and lightly sprinkle cinnamon on top. On the second piece of bread, spread a thin layer of mayo, then add (in order) turkey slices, dehydrated blueberries, grated mozzarella, and spinach. Place the first piece on bread on top of the spinach. Brush the melted butter on the outside of the sandwich on both sides. Repeat for the second sandwich. Place the sandwiches in the preheated panini press, taking care to press the lid firmly into the sandwiches. Cook 3-4 minutes until golden brown. Turn sandwiches over, press lid down firmly, and cook an additional 3-4 minutes till the other side is golden brown. Remove from the panini press and enjoy!

Tuesday, March 8, 2011

My little family's favorite mango recipe!

Need a new way to use up those ripe mangoes sitting in your fridge? Well, you are in luck, because I have an awesome way to use them! It's not exactly a quick and easy recipe, but the results are very much worth the time it takes to make it. Trust me. Hope you enjoy it as much as we do!


Chicken in Mango Sauce with Jasmine Rice
Serves 4

Ingredients
2 T. olive oil
1/4 c. honey
2 lemons, peeled, pith and seeds removed
6 cloves garlic
2 jalapeno peppers
4 chicken pieces (we prefer 4 boneless, skinless chicken breasts)
1 onion, chopped
1 bell pepper, chopped (any color)
2 mangoes, peeled and diced
2 t. grated orange peel or orange zest
2 t. paprika
1 1/2 t. salt
1/2 t. cinnamon
1/2 t. pepper
1/2 t. allspice
1 c. jasmine rice
1 can chicken broth or 16 oz. and 3/8 t. miso (my favorite substitute for buillion)

Directions
Put oil, honey, lemons, garlic and jalapeno peppers into food processor; process until thick and smooth. Place rice in an oiled 9x13 pyrex glass dish and pour chicken broth over rice. Lay chicken pieces on top of the rice. Toss on onion, bell pepper, and mango pieces. Pour oil/honey mixture over the top, then sprinkle with salt, pepper, paprika, cinnamon, and allspice. Sprinkle with orange zest.

Baked in 350〫oven for between 50 minutes and 1 hour & 10 minutes; test chicken for doneness.

Tuesday, March 1, 2011

By request...

Today has been a very busy day, mainly because I am rushing around trying to prepare for the baby's arrival. Now that I'm utterly spent from all the activity, I happened across a recipe that was requested a few weeks ago: GF pizza crust. I'll take advantage of this opportunity to get off my feet for a short while, in an effort to share the best gluten-free pizza crust (at least, to my knowledge) out there. Enjoy!

Here is a photo of our most recent topping combination: Asparagus Pizza! Yum!


First of all, you'll want to make up a batch of French Bread/Pizza Mix (page 190 in Bette Hagman's The Gluten-Free Gourmet Bakes Bread):

(for 6 cups of mix)

White rice flour – 3.5 cups
Tapioca flour – 2.5 cups
Xanthan gum – 2 Tablespoons
Unflavored gelatin – 2 (7-gram) packets
Egg Replacer – 2 Tablespoons
Sugar (white) - 1/4 cup

Stir together well or place in plastic bag and tumble. Store on pantry shelf.


Now that you have the base mix to work with, you can whip up a quick GF pizza crust, using Bette Hagman's "Seasoned Pizza Crust" recipe on page 191 in The Gluten-Free Gourmet Bakes Bread:

Dry ingredients
1 1/2 c. French Bread/Pizza Mix
3 T. almond meal
3/4 t. Italian seasoning (McCormick's)
1/2 t. salt
2 1/2 t. dry yeast granules

Wet ingredients
2 egg whites
1 1/2 T. olive oil
1/2 c. warm water

Directions
Preheat oven to 400〫F. Lightly grease a cookie sheet or a round pizza pan.

Blend the dry ingredients in a medium bowl. Set aside.

Using a heavy-duty mixer, blend wet ingredients together on low. Add flour mix. Beat on high for 3 1/2 minutes.

Spoon dough onto the prepared cookie sheet/pizza pan, and spread in circle about 12 inches in diameter, making sure the edges are raised to contain the sauce. Let rise 10 minutes in a warm place. Bake 10 minutes while preparing your toppings (for a unique topping idea, see my previous post on Indian pizza!). Spread on your choice of pizza sauces, cheeses, and meats. Bake again for 15 minutes until cheese is melted in the middle and crust is golden brown.

Makes 12-inch, thick pizza crusts or 14-inch thin pizza crusts. Each pizza serves 6 to 8.

NOTE: To make the process go faster, measure out the dry ingredients and place in a ziploc bag. Continue until all the French Bread/Pizza Mix is used. This way, whenever you want to make a quick pizza, all you need to do is add the wet ingredients to the dry mix, and you're good to go!

Friday, February 25, 2011

Incredible Pear Dessert.. even if you don't generally care for pears or ginger..

Last night, my husband and I had dinner with a couple of friends with a newborn baby. Hubby had been in the mood for a chilled dessert involving ginger and pears, so he'd found a recipe on Global Gourmet last week that he wanted to try. I made it last night, and it was absolutely wonderful! All four of us adults (the baby wasn't interested in anything but milk, of course) practically inhaled our dessert! Here's the recipe (with a modification or two):


Poached Pears with Ginger
Serves 6

Ingredients
1 c. sugar
3 c. water
1 c. white wine
Juice of 1 lemon
2 2-inch pieces of lemon zest (I use a vegetable peeler)
1 4-inch cinnamon stick
1 2-inch unpeeled piece ginger root, sliced
2 star anise
6 firm Bosc pears


Directions

Place sugar, water, wine, lemon juice, lemon zest, cinnamon stick, ginger root and star anise in a saucepan just large enough to hold all of the pears in a single layer. Bring the liquid to a boil, stirring occasionally to dissolve the sugar, and cook for about 5 minutes to allow the spices to flavor the liquid.

Core and halve the pears. Carefully place the pears in the boiling liquid, adding more water, if necessary, to cover them. Return the liquid to a boil. Cover the pan and reduce the heat to low. Simmer the pears gently until they are just tender, 10 to 20 minutes, depending on the ripeness of the pears.


Using a slotted spoon, remove the pears from the liquid and set aside. Increase the heat to high and boil to reduce the liquid to about 2 cups. Strain the sauce, discarding the solids.


If serving hot, place the pears in individual serving dishes and spoon some sauce over each.
If serving cold, place the pears in a bowl, pour the sauce over them and refrigerate, covered. The pears will keep for 2 to 3 days in the refrigerator.